Tracking hot water tank power consumption with PowerCalc in Home Assistant
Estimate hot water tank energy consumption in Home Assistant with PowerCalc by combining a binary trigger and a voltage-aware power template.
Introduction
This article explains how to use the PowerCalc integration to add your hot water tank consumption to the Home Assistant Energy dashboard without installing a dedicated power monitor.
The idea is simple: a hot water tank is a high-power resistive load with a fairly predictable schedule. If no other similar appliance overlaps with it, a single whole-home power sensor is often enough to detect heater activity and estimate its energy usage with good precision. PowerCalc is a good fit for this kind of virtual sensing because it can turn a binary trigger into both instantaneous power and accumulated energy.
Motivation
I deliberately chose a “dumb” appliance, the widely available 200L Sauter Cangar, advertised at 2200W, because a hot water tank should remain a simple device. Marketing seems to have won the battle against durability, efficiency, and technical sanity. Many newer products expose proprietary interfaces for a superficial sense of control, require Wi-Fi and cloud connectivity, and draw a constant non-negligible standby load. I also found that some of them cannot be controlled through pilot wire, forcing you to manually synchronize their schedule with your electricity provider. Traditional tanks are simpler: they are designed to be driven by pilot wire and, because they are not intended to remain permanently powered, they often include a stronger battery for features such as active anti-corrosion during off-grid periods.
If you use Home Assistant seriously, you have probably run into the “dark matter” of home energy: hardwired appliances with no built-in metering. A hot water tank is a perfect example. You can install a relay with power monitoring or add a sub-meter in the electrical panel, but if the appliance has a clean enough signature, a software-only virtual sensor can be both simpler and accurate enough for the Energy dashboard.
What is Powercalc?
Powercalc is a specialized Home Assistant integration designed to estimate power consumption for devices that don’t report it themselves. Its key feature is the Manual Virtual Power sensor. It allows you to take a simple “On/Off” state and transform it into a high-fidelity Power (W) and Energy (kWh) entity.
- The Energy Dashboard: only requires the Energy Sensor (kWh) created by PowerCalc. It manages its own long-term statistics internally.
- Utility Meters: useful when you want dedicated entities for the main UI, or when you need separate tariff-specific counters outside the dashboard.
Computing the heater’s resistance
You could assign a fixed value such as 2200 W, or derive a simple average from recent history, but in practice this power varies over time. That can easily introduce errors of 5% or more.
The reason is that voltage is not constant. During heavy usage periods I observed mains voltage falling from roughly 225 V to 215 V, often exactly when off-peak hours begin and the heater turns on. A fixed-power model therefore counts energy that was never actually drawn.
The graph makes the problem visible: heater activation coincides with a lower grid voltage, so using a fixed advertised wattage would systematically overestimate consumption.
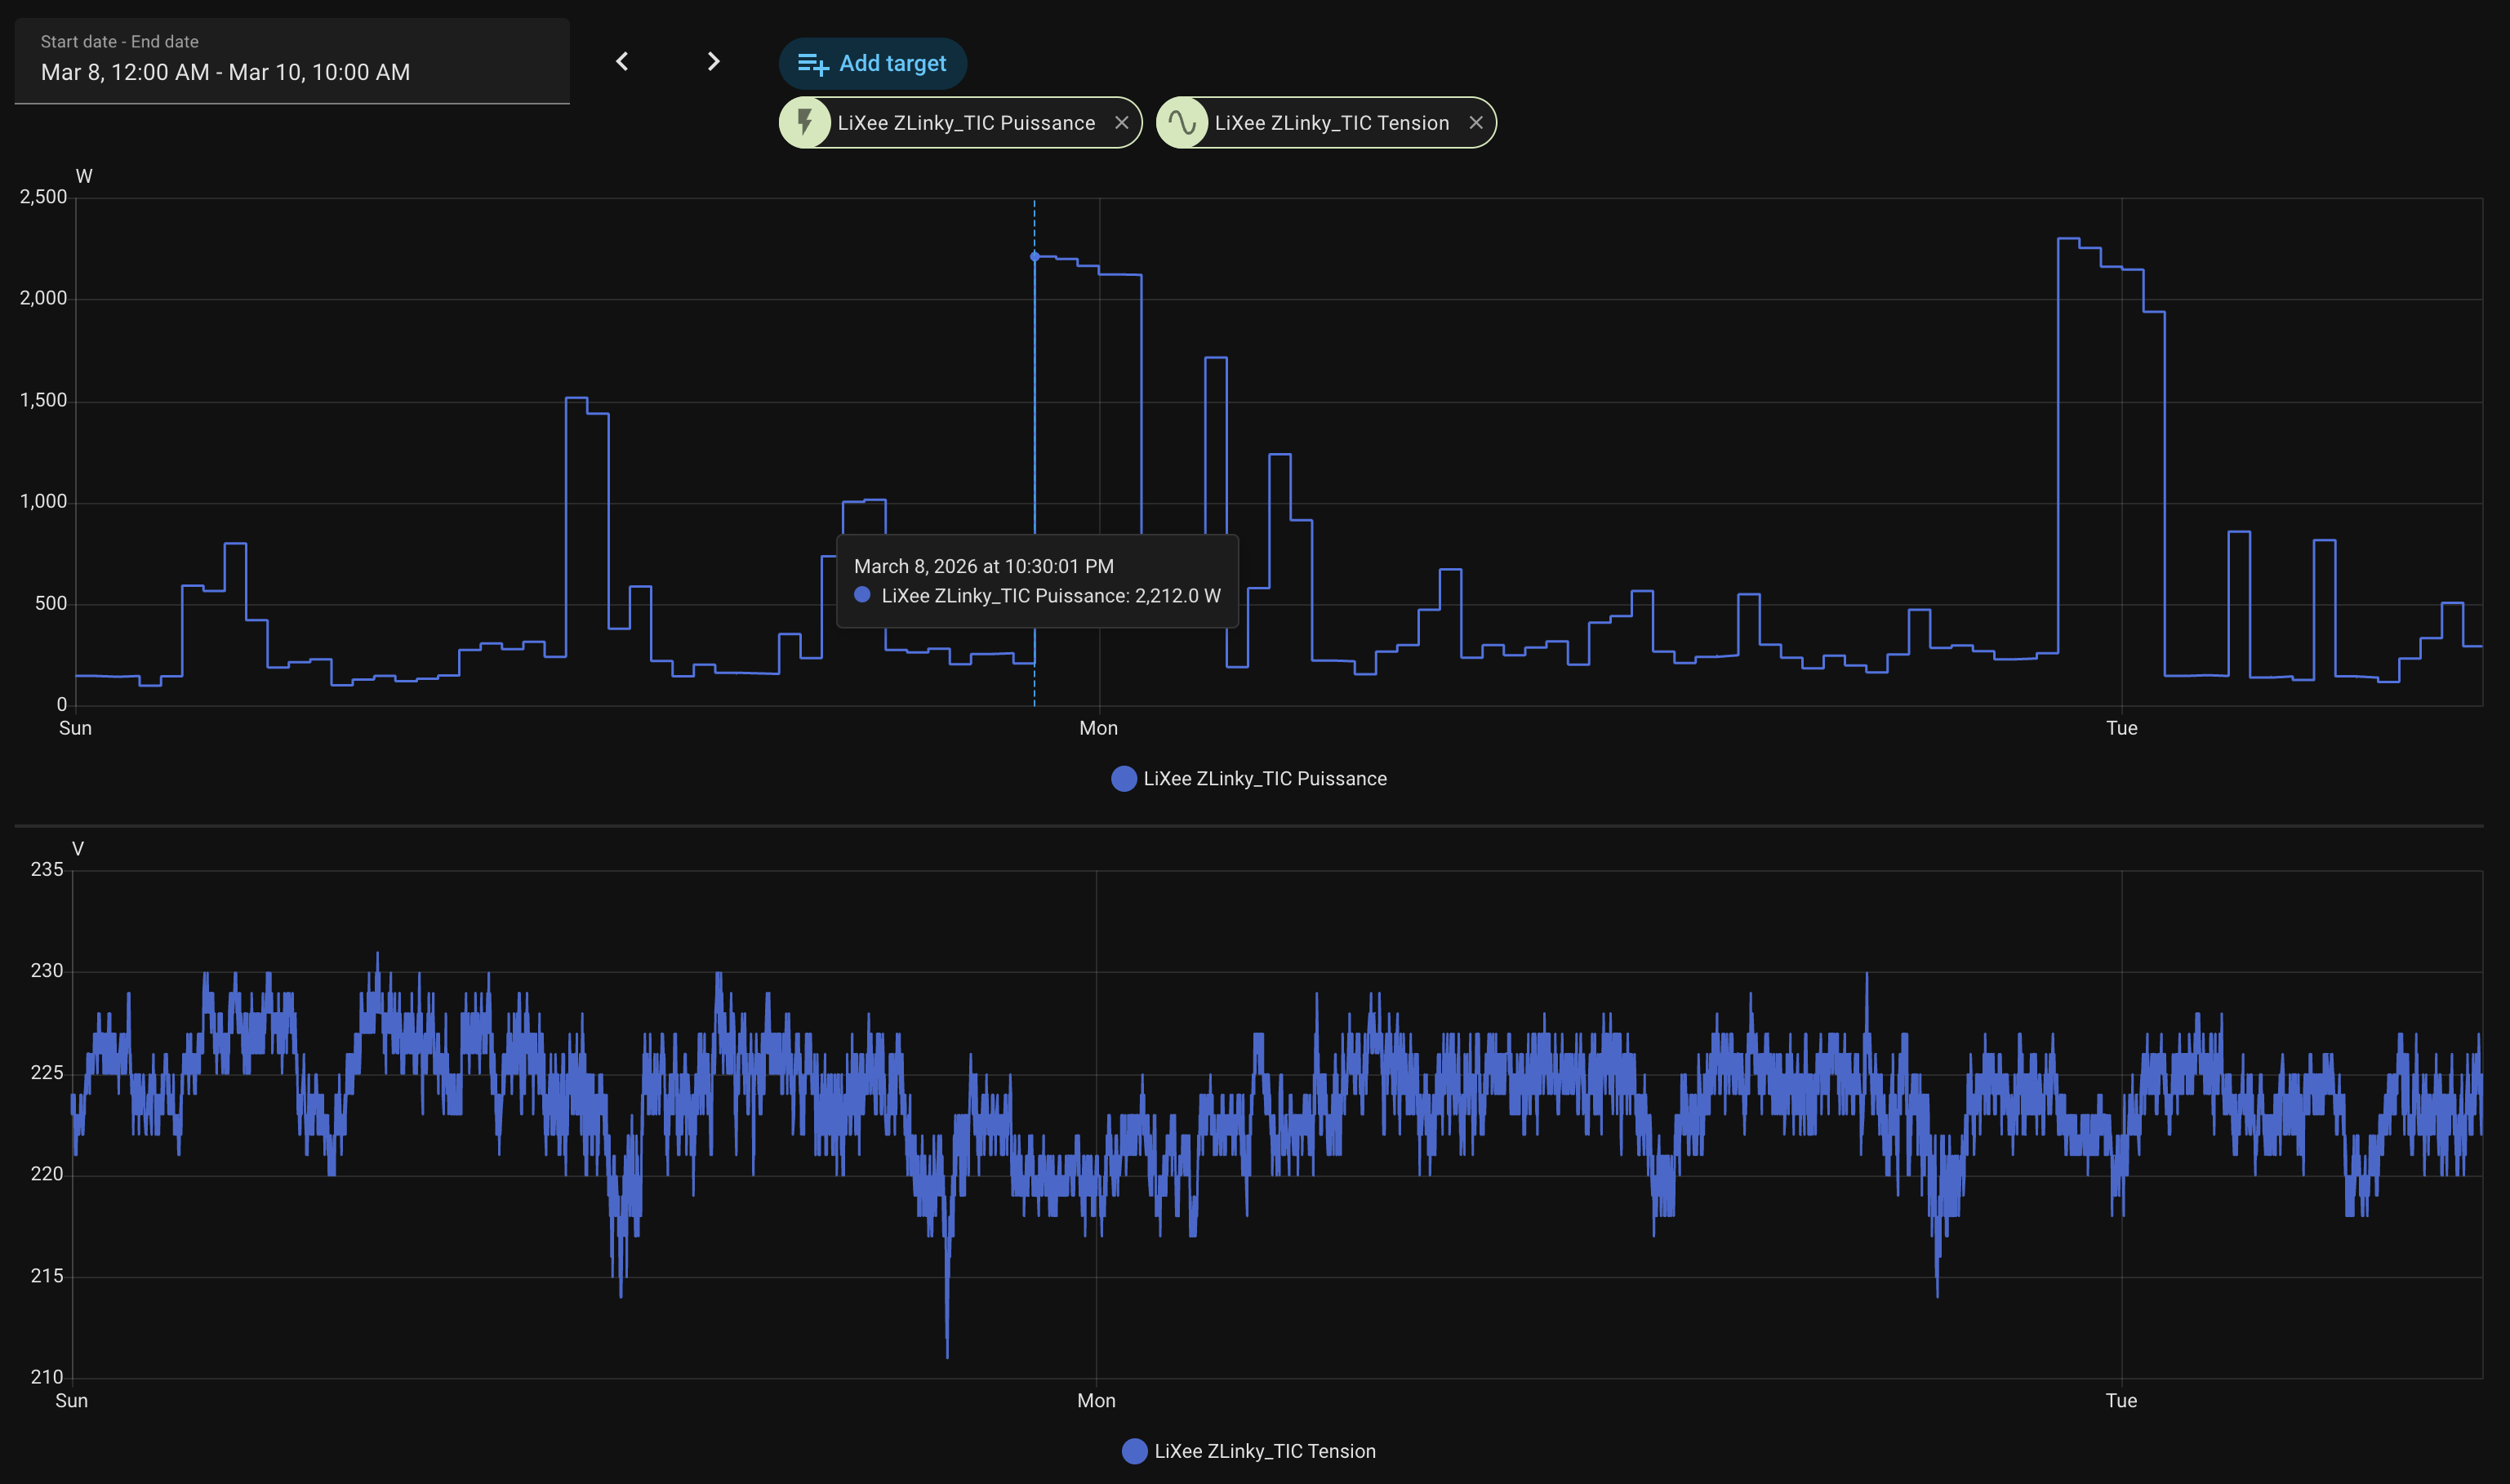
Instead, we can exploit the fact that a hot water tank behaves as a nearly pure resistive load following Ohm’s law: $P = V^2 / R$. I measured the power delta before and after the heater trigger.
| P | V | |
|---|---|---|
| Before trigger | 212 W | 220 V |
| After trigger | 2212 W | 220 V |
The formula gives $R = V^2 / P = 220^2 / 2000 = 24.2 \Omega$. In this measurement the result is close to the advertised value, but that is not always the case. I repeated the same check over several days and kept 24 $\Omega$ as the working resistance.
Once you have that resistance estimate, you can compute instantaneous power directly from the measured voltage using the same formula.
When this approach works well
This approach works well when three conditions hold:
- the appliance behaves like a mostly resistive load
- the appliance has a distinct power signature
- its schedule or operating window helps reduce ambiguity
It works less well when several similar high-power loads overlap, or when the trigger sensor is too noisy to isolate the heater reliably.
Setting up powercalc
Installation
- HACS Installation: Go to HACS -> Integrations -> Explore & Download Repositories. Search for “Powercalc” and download it.
- Restart: Restart Home Assistant to initialize the new files.
Setting up a binary sensor to track active appliance
To track an appliance virtually, PowerCalc needs a reference sensor indicating when the device is active. Here I use the whole-home power meter, a Lixee ZLinky, to detect the power delta.
A binary sensor is created in templates.yaml:
1 2 3 4 5 6 7 8 9 10 | |
To avoid false positives caused by other heavy appliances such as an oven, I use the off-peak schedule, 10 PM to 6 AM in my case, as an additional constraint. The delay_on of 15 seconds filters out short spikes, and delay_off prevents flicker when the meter briefly reports 0 W or misses an update.
Adding a sensor from PowerCalc UI
Integration Setup: Go to Settings > Devices & Services > Add Integration. Search for “Powercalc” and select it.
Follow these steps in the PowerCalc configuration flow:
Screen 1: Choose Sensor Type
- Select Virtual power (manual).
Screen 2: Create a virtual power sensor
- Source entity:
binary_sensor.water_tank_heating. - Name: “Hot water tank Power”.
- Calculation strategy: Select fixed from the dropdown.
- Standby power: Set this to 0.
- Create energy sensor: Ensure this is toggled ON.
Screen 3: Fixed config
Use the Power template field (the middle one) for your dynamic calculation.
Instead of writing a fixed wattage, use the usual Home Assistant Jinja expression that squares sensor.lixee_zlinky_tic_tension, divides by 23.07, and rounds the result to two decimals.
Screen 4: Advanced options
- Energy integration method: change this to left (Left Riemann Sum). For appliances that switch almost instantly from 0 W to 2000 W, this is usually more accurate than the default trapezoidal method.
- Energy sensor unit prefix: Ensure k (kilo) is selected.
Going further + 2026-05-19
Accuracy: quantifying the voltage error
The formula $P = V^2/R$ means that a voltage variation from the 230 V nominal is amplified when computing power, because the relationship is quadratic. With $R = 24\,\Omega$:
| Voltage | Actual power | Error vs. fixed 230 V |
|---|---|---|
| 215 V | 1927 W | −277 W (−14%) |
| 220 V | 2017 W | −187 W (−9%) |
| 225 V | 2110 W | −94 W (−4%) |
| 230 V | 2204 W | 0 |
| 235 V | 2301 W | +97 W (+4%) |
During off-peak hours the grid is typically more loaded and voltage tends to sit toward the lower end of that range. For a 3.5-hour heating cycle at 215 V, a fixed 230 V model would account for 7.7 kWh instead of the actual 6.7 kWh — a one kilowatt-hour overcount per night, or roughly 30 kWh per month.
A note on negative values. If you were to estimate heater energy by subtracting a baseline from the whole-home meter rather than using a binary trigger, a simultaneous voltage drop at heater turn-on could produce a power delta slightly lower than expected and, depending on timing, even a brief negative reading. The binary trigger approach avoids this entirely: power is either $V^2/R$ or zero, with no subtraction involved.
Alternative: native YAML without PowerCalc
If you prefer not to add a HACS dependency, the same result can be achieved with three standard Home Assistant components.
1. Template sensor — instantaneous power, in templates.yaml:
1 2 3 4 5 6 7 8 9 10 11 | |
2. Riemann sum integration — energy accumulation, in configuration.yaml:
1 2 3 4 5 6 7 | |
3. Utility meter — cycle resets and persistence across restarts, in configuration.yaml:
1 2 3 4 5 6 7 | |
The integration sensor resets to zero on Home Assistant restart. The
utility_meter wrapper adds cycle-based resets and long-term statistics,
giving the same behaviour as PowerCalc’s built-in energy sensor. Add
sensor.water_tank_energy (or a utility meter entity) to the Energy dashboard
in the usual way.
The tradeoff is three YAML blocks versus a single guided UI flow. PowerCalc remains the simpler path if HACS is already part of your setup.
Conclusion
Once the new sensors are created, they should appear in the Energy dashboard as individual devices. This moves a large share of consumption out of the generic “untracked” bucket while keeping the estimate reasonably accurate, even during periods of lower mains voltage.
The practical advantage of this method is not just accuracy. It is maintainability. If you already have a reliable whole-home meter, a virtual model in Home Assistant is often easier to operate than adding another relay, another radio device, or another component in the electrical panel.